Create the Model
Go to Camunda Modeler and open the model by choosing and selecting the `onboard-developer.bpmn file. As you can see, the start and end points have been defined, but that’s about it. Let’s start creating the model.
Essentials
When developers join a Trainink team, they need a couple of essentials to be taken care of. They need a laptop to work on (Trainink provides them with one), a user account for the company network and a number of roles in different systems, to provide access to the information they use.
Ordering a laptop takes time. It can take place while the account is being created. Once that’s both done, the account can be set up on the laptop.
Add a parallel gateway after the start event. Follow it by two branches, each with a user task:
-
Order laptop
-
Create user account
Join the two branches in another parallel gateway. Now you can add another user task after that gateway, Setup account on laptop.
When the laptop is received, the user needs to enter the id of the laptop. Open the technical configuration for the Order laptop user task. Go to the Forms section and add a form field as shown below.
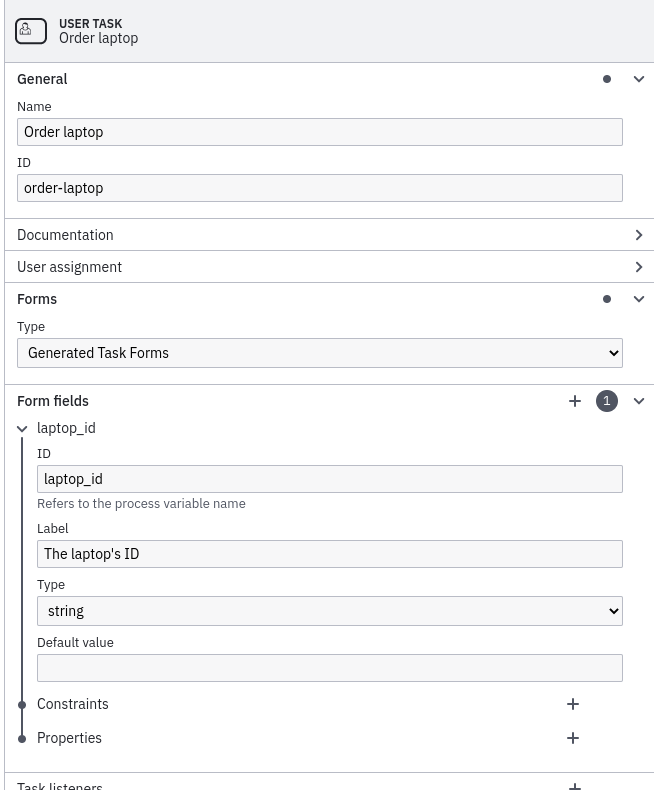
| In a fully-fledged process, the user would normally see the information the process was started with on the task screen and enter the laptop id to add to the process variables. |
The Create user account task needs a similar configuration for the dev_account_id variable.
Make sure you save the model and deploy it to Camunda using the deploy button at the bottom of the Modeler.
Test the Process
Open the Camunda webapp in your web browser and go to the Tasklist application. Start an instance of Onboard Developer by filling out the form. There should be two user tasks waiting for completion.
Before you perform the tasks, go to Cockpit and find the process instance that’s now running. You can see that the variables have the values you entered on the start form. Go back to Tasklist and complete the Order laptop and Create user account tasks. The Setup account on laptop task is now waiting. Inspect the state of the process instance in Cockpit.
Scripted Task Completion
Tasklist is a default application to complete user tasks in Camunda that can deal with relatively simple and general purpose tasks. In most organisations, performing a task involves more complicated data retrieval from various backend systems and interaction with the user on the screen. So many organisations create their own task application (GUI) to perform tasks and integrate it with Camunda.
Instead of completing the Setup account on laptop task in Tasklist, we’ll complete it with the REST API instead. After all, that’s a likely way for an external task application to do it as well.
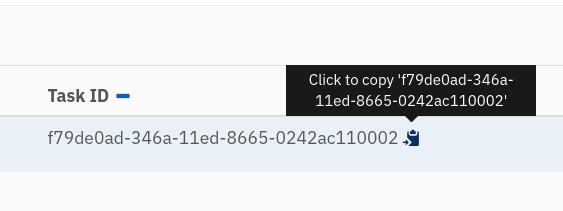
Find the process instance in Cockpit and select the Setup account on laptop task that is open. In the bottom pane, there is a tab called User Tasks, which, among other things, will show you the ID of the task (hint: it’s a long UUID value). Copy it using the clipboard button that appears on hovering the ID.
Now open an instance of your terminal application and perform the following command. Substitute your task’s id in the command, of course 😉
curl --header "Content-Type: application/json" \
  --request POST \
  --data '{"variables": {"it_admin_name": {"value": "Kelly Tinsenko"}}, "withVariablesInReturn": true}' \
  http://localhost:8080/engine-rest/task/TASK_ID/complete
As you can see, we’re passing some JSON as part of the request. This translates into Camunda creating the process variables in the same way as the task screen would have. You’ll see the output of all the process instance’s variables if the call is successful.
Check in Cockpit that the user task is now completed and the process is too.
Go ahead and fire off the previous curl request once more.
It should fail, because the user task with the ID you gave it, no longer exists.